
To remove a user’s SSO connection, you must be an Organisation Administrator and sign in with a username and password rather than SSO. This guide explains when you might need to clear a user’s SSO link and how to do it. It applies to both SSO users and users managed by SCIM.
1. How SSO Affects a User’s Account
Once a user has signed in with SSO, their account is linked to your Identity Provider (IdP):
- The user signs in through your IdP, and their ISMS.online username and password will no longer work.
- The user’s Name and Email address are locked and can’t be edited within ISMS.online.
You may occasionally need to clear this link, for example if a user’s email address has changed or their SSO connection needs resetting.
2. Navigating to the User’s Settings
- Click the dropdown menu under your name in the top-right corner of the homepage.
- Select Organisation settings.
- Click the Users tab, then select the user whose SSO connection you want to remove.
- Open the User settings tab.
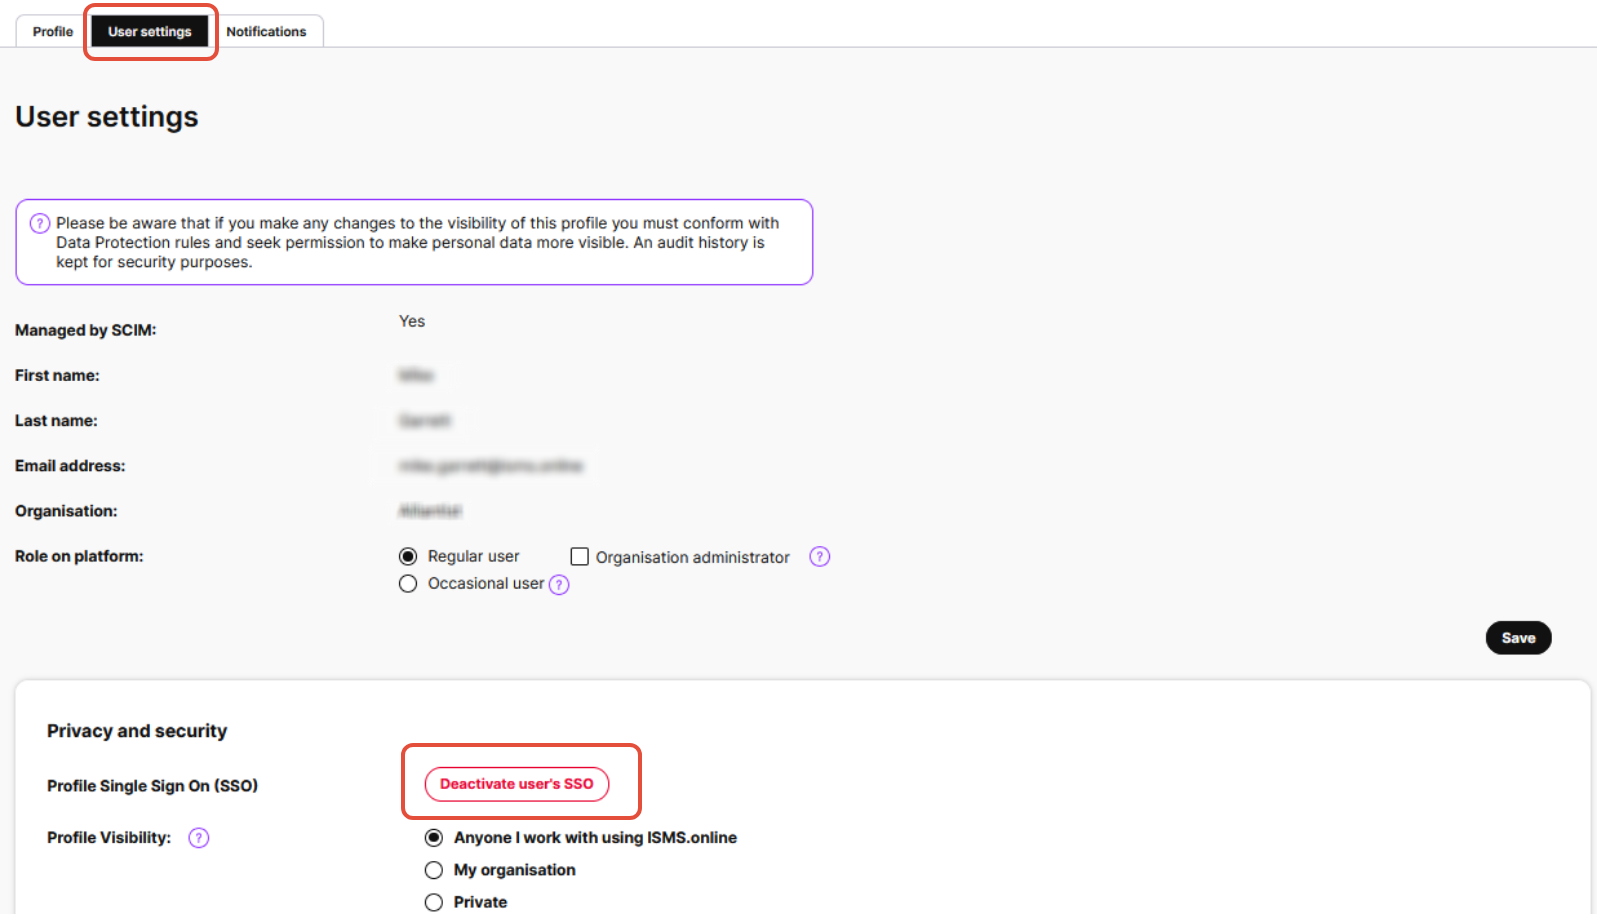
3. Deactivating the User’s SSO
In the Privacy and security section, the Profile Single Sign On (SSO) option replaces the Two-Factor Authentication setting for SSO users.
- Click Deactivate user’s SSO.
- Enter your password when prompted to confirm the change.
Note:
As the change requires password confirmation, it must be made from an Organisation Administrator account that does not use SSO.
4. After the SSO Connection Is Removed
- You (or the user) can now edit the user’s Name and Email address if needed (for SCIM-managed users, make these changes in your Identity Provider).
- The user can reconnect to SSO by clicking Sign in with SSO on the login page, as long as their ISMS.online email address matches the primary email in your Identity Provider.
5. Users Managed by SCIM
If your organisation uses SCIM provisioning, your Identity Provider (IdP) automatically keeps user details in ISMS.online up to date. Name or email changes should therefore be made in your IdP, and they will sync across automatically.
You may still need to remove SSO from a SCIM-managed user if their primary email in your IdP is different from the email on their existing ISMS.online account, and you want to connect the IdP user to that existing account. In this case, pause automatic provisioning first, so that the next sync doesn’t reconnect or recreate the user before you’ve finished.
- Pause automatic provisioning for the ISMS.online application in your IdP:
- Okta: Open the ISMS.online app, go to Provisioning > To App, click Edit, and turn off Create Users and Update User Attributes.
- Microsoft Entra ID: In the ISMS.online enterprise application, go to Provisioning and stop provisioning.
- Google Workspace: In the ISMS.online app settings, turn off automatic user provisioning.
- If SCIM has created a second account for the user, free up its email address:
- Open the new account’s User settings and click Deactivate user’s SSO (see section 3).
- Change the new account’s email address to a different one. You can use a sub-address, for example jane.doe+old@company.com.
- Update the existing account:
- If it’s already connected to SSO, click Deactivate user’s SSO.
- Change its email address to match the user’s primary email in your IdP.
- Turn automatic provisioning back on and ask the user to sign in using Sign in with SSO. Their IdP account will connect to their existing ISMS.online account.
Note:
Email addresses must be unique across ISMS.online, so the second account’s email must be changed before the existing account can use it. While provisioning is paused, new users, changes and removals in your IdP won’t sync to ISMS.online, so turn it back on as soon as you’ve finished.
6. If All Your Administrators Use SSO
If every Organisation Administrator in your platform signs in with SSO, you’ll need a non-SSO administrator account to complete this change. You can create a new user manually and give them the Organisation Administrator role.
Note:
For security, we recommend either:
- setting up Two-Factor Authentication on this account, or
- keeping the account deactivated until it’s needed.
If you have any questions or need further assistance, please get in touch with our support team at support@isms.online or via the Live Chat. We’re here to help.